Custom View Development
This section covers the tools and concepts frequently used for the development of all custom views.
View designer
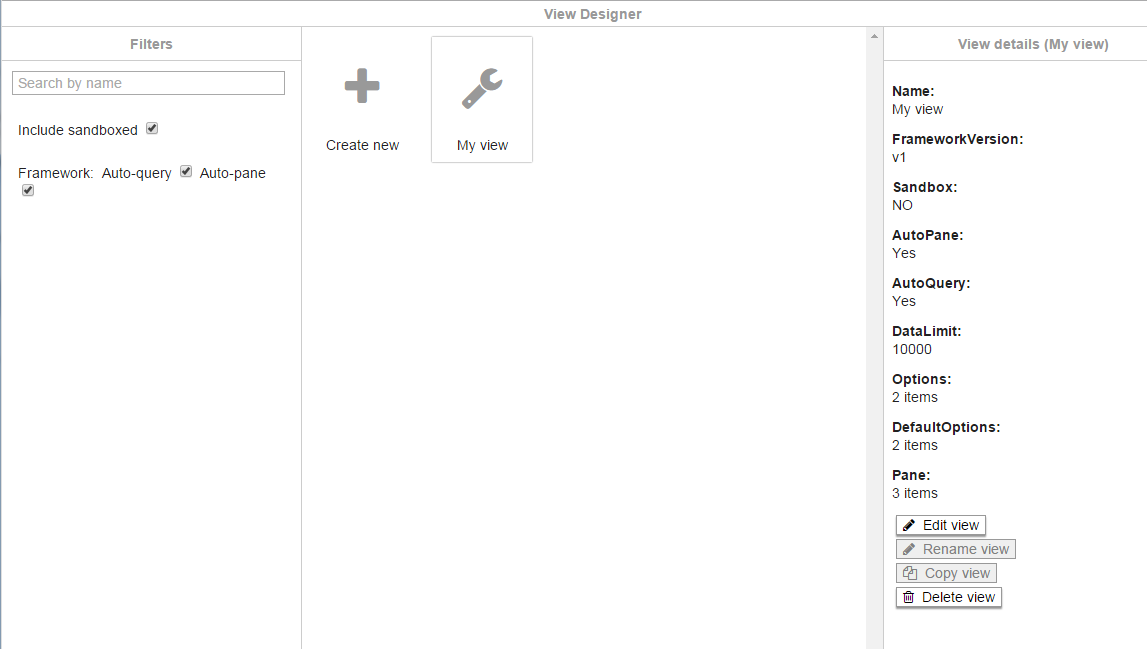
The View designer is the user-interface through which you can manage Custom views within a file.
It allows you to create/delete existing custom views and provides basic interface for you to create/modify index.html, manifest.json and other resources associated with your View.
Once you have defined your View the manifest.json and index.html are created with a basic default template. You can edit these within the view designer, or in your own third party app. The index.html and manifest.json must be stored as a file in the view designer, along with any additional files which are created. Each view you develop MUST have an index.html and a manifest.json file associated with it.
Depending on the interface you are currently in the View designer is accessible from:
- Data Explorer: Three dots on the top-right hand corner > View designer…
To create a new View simply open the View designer and click “Create new”.
To edit your view simply click on the view name and click the “Edit” button on the right hand side of the View designer.
If you wish to add your own resources simply drag and drop them on the left hand pane of the View designer right under your existing resources.
Manifest
This represents a configuration file for the view and defines the options and limitations of your view.
For example, it is the place where you tell that you want to have a Split and custom options and where to place them i.e. Toolbar, X axis toolbar etc.
The JSON below shows main sections of the manifest (not in correct JSON syntax as JSON below is for illustration purpose only).
{
  ...

  // Auto pane enabled
  "autoPane": true,

  // Auto query enable
  "autoQuery": true,

  ...

  // Options where you define the different options your view can have.
  // This is a map where the key is a unique value and value the option
  // declaration itself.
  "options": {

    "items": {

      // Defining of a measures, here the "measures" is the
      // internal key for the option.
      "measures": {

        // The display name which the user sees in the menus etc.
        "displayName": "Measure",
        "type": "MEASURE",

        // Marking it as a mandatory, meaning this must be specified.
        "mandatory": true
      },

      // Pane X configuration
      "paneX": {
        "displayName": "Pane X",
        "type": "GROUPING",
        "list": true
      },
      ...

      // A split option.
      "split": {
        "displayName": "Split",
        "type": "GROUPING"
      }
    },

    // Structure which controls where the options you defined above
    // appear in the UI.
    "structure": {

      // Adding key of the individual option above to the toolbar.
      "toolbar": [
        "measures",
        "split"
      ],
      "x": [
        "paneX"
      ],
      "y": [
        "paneY"
      ]
    }
  },

  // Defines the default options.
  "defaultOptions": {
    "items": {},

    // User configuration options for auto-paning.
    "pane": {
      "headerWidth": 100,
      "headerHeight": 30,
      "paneWidth": 100,
      "paneHeight": 100,
      "xHeaderPlacement": "TOP",
      "yHeaderPlacement": "LEFT"
    }
  },

  // Paning constraints of the view.
  "pane": {
    "minWidth": 50,
    "minHeight": 50,
    "maxCells": 20
  }
}
For more information the different configuration and settings you can specify in your manifest see ViewApiManifest documentation.
Index.html
This is the main page which is loaded by the application to show your View. This is the place where you write your entire view rendering and update logic.
You must have this page defined in your Custom view, otherwise your View will not be displayed.
A typical index page looks like the following, in this case it simply renders the result of the auto-query onto the page.
<!doctype html>
<html>
<head>
  <meta charset="utf-8">

  <style>
    html, body, main {

      /* Ensure the body fills the view, so clicks are handled everywhere: */
      width: 100%;
      height: 100%;
    }
    main {
      font-family: monospace;
      font-size: 20px;
      white-space: pre;
    }
  </style>

  <!-- Put SCRIPT tags to load 3rd party libraries here -->

</head>

<body>

  <main id="main"></main><!-- This element is where the view will render -->

  <script src="/_global_/customview/v1/omniscope.js"></script><!-- Add the Omniscope custom view API -->

  <script>
    if (!omniscope || !omniscope.view) throw new Error("Omniscope chart API is not loaded");
    omniscope.view.on("load", function() {
        window.onerror = function(msg) {
          omniscope.view.error(msg);
        }
    });

    // Ensure clicks on unoccupied space clear the selection in Omniscope, and close menus:
    document.body.addEventListener("click", function() {
      omniscope.view.whitespaceClick();
    });

    // Naively redraw on any of these events
    // (load = first init, update = external settings/state change, resize = browser window resized)
    omniscope.view.on(["load", "update", "resize"], function() {

      // Retrieve the auto-query results, a 2d array ([row][column]):
      var data = omniscope.view.context().result.data.records;

      document.getElementById("main").textContent = JSON.stringify(data, null, 2);
    });

  </script>

</body>
</html>